Saturday, November 26, 2016

Adjust/test Electric Trailer Brakes

My electric trailer brakes are auto adjust in the forward mode. I installed new hubs and wanted to make sure the brakes were adjusted before I hit the road. Had to come up with a way to get the wheel spinning, then lock it up a few times so the adjusters could do their thing. The brakes can be adjusted manually, but unlike the regular star wheel adjusters, these are extremely hard to back off without getting under the trailer.

The parts are all available at your local hardware store in the plumbing dept.

If you use a standard 3/8" drill...the load will make it heat up during the first go-round. I employed the drill motor that I use for my trailer jack after smoking my 3/8" model. 


Monday, November 7, 2016

Electric Brakes for your Boat Trailer

The first argument I hear against electric trailer brakes is, "Electricity and water don't mix!"

Totally electric brakes work by magnetism. Twelve volt power is used to make magnets. Sealed magnets. The strength of the magnets is determined by how much braking is called for. Magnets work in air, water or even a vacuum. There is absolutely no mixing of water and electricity.

The next argument I hear is that electric drum brakes don't hold up well with salt water dunkings.

I had a tandem boat trailer that had electric brakes on one axle and surge discs on the other because I got tired of replacing disc brake parts and decided to try all electric. The physical appearance of the drum vs the disc of course favored the disc - the drum did look rusty, but the function is what's really important. The electric brakes were far more reliable than the discs.

Here's how my boat trailer ended up with one axle being surge disc and the other being electric drum:
One of my boats came on a trailer without brakes. I told the shop I wouldn't take the (#3,600 gross) boat off the lot without trailer brakes, so at my expense, they put surge disc brakes on the trailer. Within 500 miles I had a bearing failure. The hub was replaced under warranty, but continued to run hotter than I liked, so I had a second axle put on the trailer. Actually, they put two new axles, with 4 new tires and a new actuator on while I waited. I was a happy camper.

After about another 500 miles I lost another bearing only 50 miles after I had checked the temps of the hubs with an IR gun. I was ready this time with a spare hub and was on the road again in about an hour. This is the reason disc brake folks carry so many spare parts and tools.

I experimented with ways to keep this from happening again, like a stiff spring to keep the brakes from coming on so soon, and leaving a tiny bit more clearance in the castle nut/bearing (an additional flat) to wobble the rotor so it would push the pads back into the caliper. I had good results with the heat problem, but only 3,000 miles after a complete disc brake overhaul (new pads, turned rotors) on the way to Alaska, there were no pads left on one brake, with the backing plate constantly gouging the rotor. We searched for parts and found electric brake parts available at auto parts and RV stores but no parts were available for my discs, so I had to lock out the brakes for the remaining 11,000 miles.


The van is a one ton, so not having trailer brakes wasn't all that scary. By the way, those are passenger car radials on the boat trailer.

When I returned home, I contacted the disc brake people. They said 3,000 miles was about all I could expect from the pads and I should just get some new ones (at about $35 each wheel). Trouble was the caliper pistons were corroded in the calipers too so I opted to put a set of electric brakes on that axle and continue to run the surge brakes on the other axle. The entire replacement from hydraulic disc to electric drum was $150 for both wheels, and installation was 4 bolts, 2 wires and a castle nut for each wheel.

Not long after the I put on the electric brakes, a hydraulic line ruptured on the disc brake side. I knew to try the bleeder screws on the calipers before I invested in any new parts - they broke off. So the second axle got electric brakes as well. Never had a problem after that - 80% of the time in salt water.The electric brakes were still working fine when I sold the boat.

"Sharkskin" on left, generic on right. The Sharkskin look better - the generic worked better.


What else about electric brakes?
*They work in reverse (you don't need a reverse lockout solonoid) - nice on a slippery ramp
*You can test them and apply them at will so you know they'll be there for you
*The square you see below, with the silver button is attached to the magnet arm and rotates when the magnet is energized, pushing the shoes outward. This is about as simple as it gets - no close tolerance hydraulics.


*No bleeding or bleeder screws to break off.
*No adjusting required with Nev-R Adjust brand
*There are no moving parts in the coupler with electric brakes
*New EVERYTHING is only about $150 per axle,
*Rebuild is 4 bolts and 2 wires at each wheel - includes drum, backing plate w/ shoes, bearings and seal.
*They are off while compression braking on steep down grades

But you will need a controller in your vehicle (the brakes will not work without one) and a breakaway battery on the trailer.

I'd been happy with the electric brakes on my boat trailer for years, then towed a different trailer with a new set of electric brakes on it and decided I'd replace the 40 year old drums. 


Go electric!

Saturday, September 24, 2016

Anchor Chain

How much chain do you use with your boat anchor? Three feet, a boat length, two or three boat lengths, all chain?

Chain is heavy, comes up dirty, has no stretch and often requires more than just a cleat to make it fast, especially if you want to include some elasticity in the rode.

In the pic below, when is the chain doing work?
I'm thinking at A, the boat doesn't even need an anchor - but anyone who expects these conditions for any length of time hasn't spent too much time on the water.

At B, the chain and anchor are sharing the load.

At C, the anchor is doing all the work, whether the rode is chain (w/ snubber), cable or nylon.

I'll be the first to admit that chain aids in setting - drag the anchor horizontal to get a good bite - as in B. But modern anchors set quickly even without a horizontal pull, at least my Rocna does at ~3:1 without any chain. Then, if we're expecting enthusiastic overnight weather we might scope out to 7:1.

When I anchor overnight or expect the boat to be left unattended, I like to think about the C scenario. A gust or surge can take all the catenary out of the rode. In the case of all chain, this would mean I'd need a snubber to prevent overloading deck fixtures. That same snubber is going to complicate things if there is any reason to want to quickly retrieve the anchor - like it's dragging and needs to be reset or another boat dragging down on me in 40 mph winds/rain with green water coming over the fordeck.
 And c'mon, who really needs to be dragging nasty chain over the gunner after spending a few hours on the sand bar or off the beach?

My point is, if chain makes you comfortable, fine, I might even consider it if I was leaving my boat unattended for a long period of time anchored in coral or sharp rocks, but normally I see the rode daily because I don't spend weeks anchored. Also, if you need help in setting your anchor then chain is good, but if you expect any amount of chain to be of benefit in extreme conditions I think you're fooling yourself. And the inconvenience of any chain with the belief that it makes you ultimately safer...well, that's hard for me to swallow.

Caveat - my experiences have been with boats less than 35', so if you've got a bigger boat YMMV.

Wednesday, August 31, 2016

Land N Sea Door Lock

Unless it's raining, we cruise with the front door open -- love the view and breeze. The grand-kids enjoy hanging out the front door while underway.


My dog Merlin also takes delight in having his head out the front door.


However, it's easy to forget that a gust of wind or an unusual roll of the boat can cause that front door to slam shut. It's heart stopping when it does but thankfully no one has been a victim of the slam - we'd been using a bungie cord outside hooked from the door to the rail to keep it open. But I wanted a way to easily lock the door in the open position from inside the boat. Here's what I cam up with.

There's a stop/post outside the boat to keep the open door away from the window when it's open. I made a guide for the inside of the post so I could drill a hole straight through the post exiting inside the boat. Then I made a cap for the post with a hole in the middle. The plan was to run a long bolt from the inside of the boat, through the stop/post and into the door. I could then tighten the bolt from inside the boat into the door and lock it open.
Threaded bolt (allthread) even with the end of the door stop/post.


The door doesn't lay flat against the stop, so I threaded a round plate onto the bolt and used thickened epoxy between the plate and the door to get the angle right. Then I layed the door on the plate in the open position until the epoxy kicked. Then screwed the plate through the epoxy into the door. I then tapered the hole on the plate so the bolt could easily find the threads in the plate.
Round threaded aluminum plate on the outside of the front door.

 Instead of a bolt I used stainless allthread. After running it through the front of the boat into the plate, I figured the length that was needed 'outside' the boat, and ran a nylock nut down the threads so when I inserted the allthread from the outside through the stop/post it would stop right at the top of the post, as show in the picture above. Now when the door was open against the stop, the allthread would be as close as possible to the threaded plate and by pushing it about 1/4" I could engage the threads.

Inside, I made a large round wood handle for the part of the allthread that I'd need to push, then turn to lock the door. Between the handle and the boat, I used a spring to keep the handle pulled away from the boat so the rod would not stick out of the post/stop on the outside.

Now, with the door in the open position, I push the handle about 1/4" and turn it until it's tight - snugging the door open.
The spring between the handle and boat keeps not only keeps the rod from striking out of the stop/post outside, but also keeps the handle from rattling when not holding the door.


Thursday, July 21, 2016

Staying Cool Aboard


My wife has MS and is completely destroyed by the heat. Pretending to be comfortable by funneling 80° air through the cabin doesn’t cut it. I have licked the heat though, at least for us, via air conditioning. I’m backyard and resource challenged so I don’t care how it looks or what you think as long as it works. Here’s what I’ve done.

On our 18 foot cuddy I used a 5,000 BTU window unit and a Honda 1000i generator.
We often boated on a similar boat, which I outfitted the same way.

When we became partners on a 21 foot pilot house, I installed a 9,200 BTU Polar Cub powered by a Honda 2000i.


Our current boat is a 43 year old 28’ houseboat with a 13,500 BTU RV rooftop unit powered by a Honda 3000i with a remote start so we can fire it up with the touch of a button.

Better Brakes for Big Duck

The totally electric brakes on Big Duck's trailer have always done the job, but a few months ago I pulled a different trailer with electric brakes and was impressed by their stopping power - even had to use the controller to dial back the voltage.

I had previously installed new shoes, backing plates and magnets so I thought I'd machine the drums and magnet surfaces to see if there would be any improvement - then discovered that for $60 a wheel I could have brand new drums, bearings and seals and upgrade from 5,200 lbs outer bearings to 6,000 lb bearings (the inner bearing is the same for both specs). So new hubs/drums it is.


I had been working with a 3 ton floor jack, running it up under one axle at a time but not only do I have dirt under the trailer that makes positioning the jack difficult, I almost have to stand on the handle while pumping which wears me out.

So I bought an air/hydraulic 12 ton bottle jack and fitted the screw out top with a hockey puck.


Now I just put the jack under the frame, hook up the compressed air, squeeze the trigger and up she goes. It's a lot easier raising the frame than trying to finagle the floor jack around a wheel and under an axle in dirt and grass. (I wouldn't want to try this frame lifting with an aluminum trailer).
I made a long reach handle to release the pressure and put a "T" handle in it for more control


Then I remembered a spring pad weld that had broke loose and let the axle slide back about 1/2". This destroyed a tire a while back and I thought better braking might tax the other welds if the axles weren't real snug to the springs. So bought new 9/16 tie plate kits for all 4 springs and will torque the U-bolts to the max.

#4203-LZP

And just to be on the safe side, I bought Timken bearings instead of using the "Made in China" ones that came with the drums. I'm still gambling on the China made races that came installed in the drums?


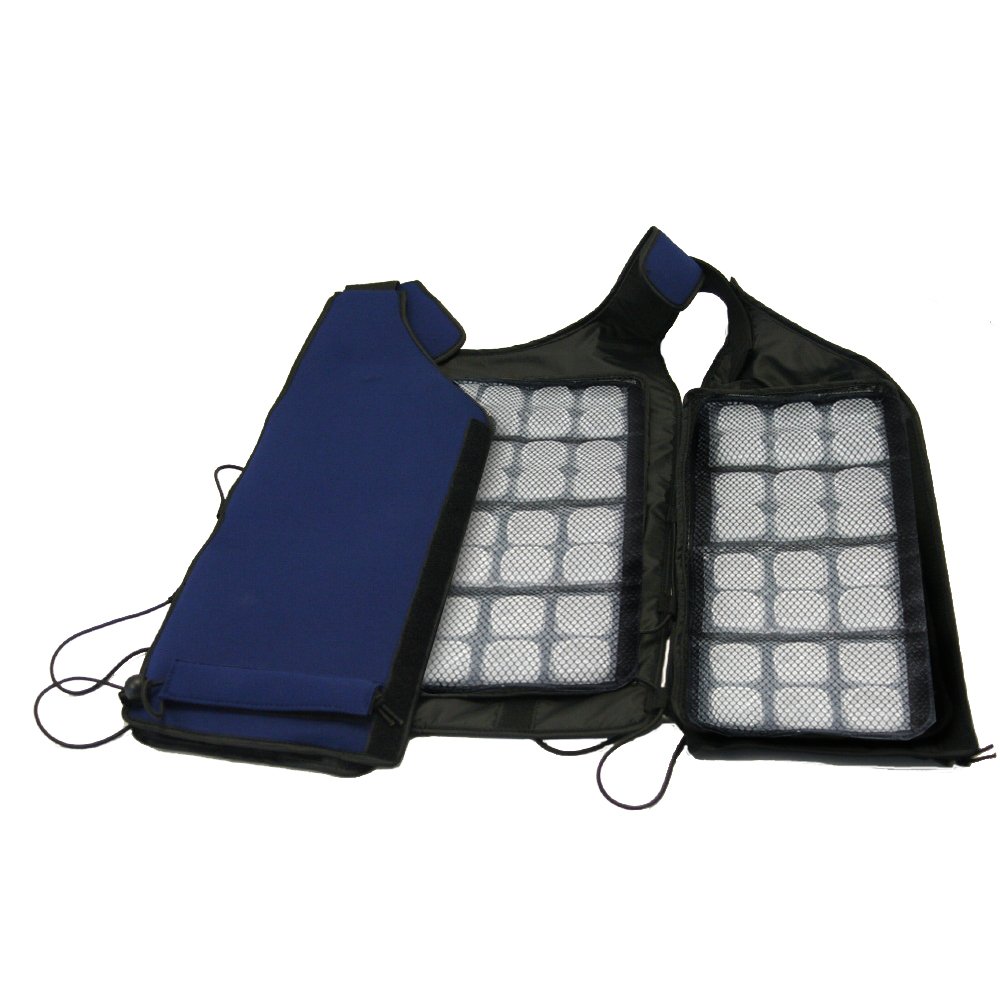
To make the drum swap a real challenge, it's been sweltering here for weeks (mid and upper 90's all day). I've resorted to using my wife's Cool Vest when I work outside. You put the inserts in the freezer and when you wear it the little ice cubes keep you cool for a couple hours.


When I get her all together I'll be ready for a Fall Outing.

Tuesday, June 28, 2016

Foot Operated Bilge Pump

When I was about 12 years old, a fellow a couple houses from us down passed away. I was asked to come by his garage/shop and pick out anything that I found interesting. This is one of the 3 items I remember selecting even though I had no interest in boating at the time. Interestingly enough, the other two items were also boating related, but that's a story for another time.

It's a foot operated bilge pump which uses a toilet plunger cup.


 But after all these years the plunger part has hardened and split.
I was in the Dollar Store the other day and spotted a plunger for $1.

For a buck I brought it home to see if it would fit - and it does. So I was able to overhaul a 60 year old pump for a measly dollar by only opening up the top of the cup.
The cup comes with a closed neck.


All the parts of the pump


This is the bottom of the base. The holes are covered on the other side by a rubber disc fixed only in the center. This is the "intake" valve.


The top piece is a friction fit over the cup stem using a brass disc as the 'exhaust' valve.

Quite an ingenious set up that allows pumping the bilge without using your hands (like for rowing or hanging on?)