You can make any size you want by just using more wire. Unlike hose clamps, when properly done, these clamps have no sharp edges or protrusions.
It takes a while to master making the clamps so don't wait until there's an emergency.
Get one here.
 |
| The spool of wire came from Harbor Freight |
 |
| You can clamp anything, not just hose. You might want to fasten a small cleat to a rail for your flag halyard. |
Here I used one to reinforce a 40 year old zamak stanchion base until I got around to replacing it.
~~~~~~~~~~~~~~~~~~~~~~~~~~~~~~~~~~~~~~~~~~~~~~~~~~~
Update 1/18/18
I thought the price of the Clamptite tool was a little steep, so I decided to see if I could make an improved model on my own.
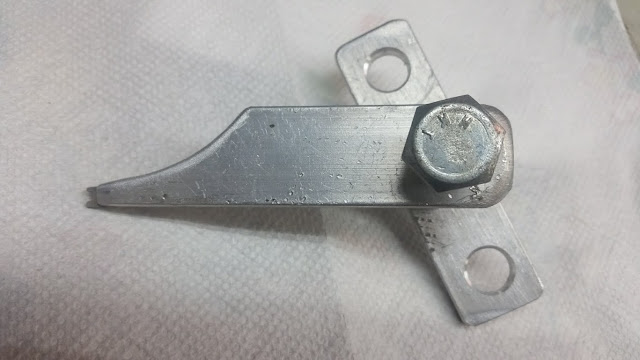
I started out with a piece of 1/4 X 1 X 8 inch aluminum strap, and a 1/2" bolt with two nuts.
I cut the strap into two equal pieces and put a taper on one of them. Then I drilled 1/2" holes in them as pictured - the piece with 3 holes only requires the center hole (I'll explain the other two holes later). Then I drilled two 3/32" holes through the bolt.
Now file a notch in the end of the taper. I experimented by drilling and tapping the taper and using a 6/32" bolt, but it didn't work any better than the notch. If you use the notch the taper should actually be more pointed.
Now you're done. It goes together like this.
The nuts squeeze the plate so it's locked firmly on the bolt. It will be used as a handle.
Here's how it works...
Fold a piece of stainless wire at the middle. I use 24" for everything. Then wrap the hose as pictured.
The Clamptite instructions say to double wrap the wire, but I thought I'd try the single wrap to see how it worked out.
Now position your home-made clamp like this - the tapered slot goes in the loop of the wire and the loose ends of the wire go through the holes in the bolt.
Now, using the 'handle' between the nuts, wind up the wire until it's good and tight against the hose.
Then swing the tool 180° over the hose, and cut both wires about 1/4" from the hose.
Then poke the ends of the wire against the hose.
This home-made tool gets the job done in a very simple manner compared to the Clamptite version. I will use it for non critical jobs as it is easier, but I will continue to use the Clamptite version for really important clamping.
~~~~
I put the additional holes in the windup 'handle' thinking that I might need additional leverage to tighten the clamp - accomplished by using the bolt in one of the end holes for more turning force, but found the center hole sufficient, not to mention clearance issues with a longer handle.
~~~~
I can't help messing with it - here's the latest modification. It helps to keep the wire loop in the slot when the tool is swung over the hose. Not absolutely necessary, but...


No comments:
Post a Comment
Note: Only a member of this blog may post a comment.