Monday, April 28, 2014

Wire Clamp Maker

Here's a little tool that is very handy aboard and around the shop. It's used with a piece of spool wire to make clamps The clamps are single use...they must be cut for removal, but for what they cost to make, that's not a problem.

You can make any size you want by just using more wire. Unlike hose clamps, when properly done, these clamps have no sharp edges or protrusions.

It takes a while to master making the clamps so don't wait until there's an emergency.

Get one here.

The spool of wire came from Harbor Freight


You can clamp anything, not just hose. You might want to fasten a small cleat to a rail for your flag halyard.


Here I used one to reinforce a 40 year old zamak stanchion base until I got around to replacing it.

~~~~~~~~~~~~~~~~~~~~~~~~~~~~~~~~~~~~~~~~~~~~~~~~~~~

Update 1/18/18

I thought the price of the Clamptite tool was a little steep, so I decided to see if I could make an improved model on my own.

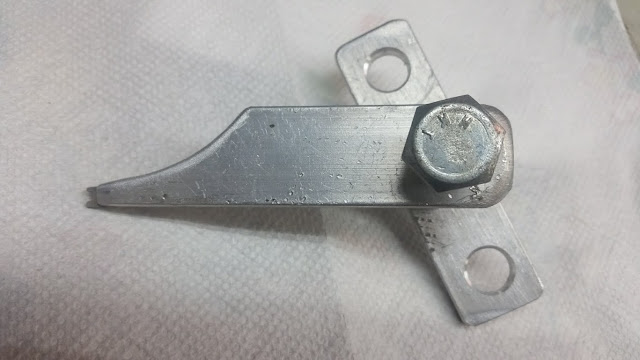
I started out with a piece of 1/4 X 1 X 8 inch aluminum strap, and a 1/2" bolt with two nuts.


I cut the strap into two equal pieces  and put a taper on one of them. Then I drilled 1/2" holes in them as pictured - the piece with 3 holes only requires the center hole (I'll explain the other two holes later). Then I drilled two 3/32" holes through the bolt.

Now file a notch in the end of the taper. I experimented by drilling and tapping the taper and using a 6/32" bolt, but it didn't work any better than the notch. If you use the notch the taper should actually be more pointed.


Now you're done. It goes together like this.


The nuts squeeze the plate so it's locked firmly on the bolt. It will be used as a handle.

Here's how it works...
Fold a piece of stainless wire at the middle. I use 24" for everything. Then wrap the hose as pictured.


The Clamptite instructions say to double wrap the wire, but I thought I'd try the single wrap to see how it worked out.

Now position your home-made clamp like this - the tapered slot goes in the loop of the wire and the loose ends of the wire go through the holes in the bolt.


Now, using the 'handle' between the nuts, wind up the wire until it's good and tight against the hose.


Then swing the tool 180° over the hose, and cut both wires about 1/4" from the hose.


Then poke the ends of the wire against the hose.


I get the ends into the hose far enough so the clamp doesn't have any sharp protrusions.  I do this by pushing them down with a slotted screw driver, then using a hammer on the end of the screwdriver to tap the ends tucked in all the way.

This home-made tool gets the job done in a very simple manner compared to the Clamptite version. I will use it for non critical jobs as it is easier, but I will continue to use the Clamptite version for really important clamping.

~~~~

I put the additional holes in the windup 'handle' thinking that I might need additional leverage to tighten the clamp - accomplished by using the bolt in one of the end holes for more turning force, but found the center hole sufficient, not to mention clearance issues with a longer handle.

~~~~

I can't help messing with it - here's the latest modification. It helps to keep the wire loop in the slot when the tool is swung over the hose. Not absolutely necessary, but...


Saturday, April 26, 2014

Land N Sea Roof Rails

This is a zamak stanchion base on my 40 year old boat. It appears to have machine screws holding it in place. And a pop rivet securing the stanchion to the base. 


The roof rail seemed quite secure despite a couple bases showing corrosion/cracking as pictured above so up to this point I haven't been inspired to look into addressing a fix. Now that I'm taking the dinghy with me on Big Duck, and need to pull it up over the rail to get it on the roof I thought I'd better make sure this stanchion base didn't let loose.


I'd redone stanchion bases on the fore and aft decks and learned that the machine screws wouldn't easily come out -- I'd broken all but one trying to get them out. I found several of them cut off at the deck under some of the not original bases confirming that I wasn't the first to have this problem.. I generously applied penetrating oil to the fasteners with the cracked base on the roof and waited overnight.

The next day I got my butane pencil torch out thinking a little heat might be necessary, but before putting the flame to the Phillips heads I thought I'd give them a gentle nudge with the screwdriver. Much to my amazement they would all turn...a totally different scenario than with the other bases I'd replaced.


Well, the fasteners would turn, but they wouldn't come up. I worked with them and eventually removed all three. They brought up wet foam with them -- no wonder they weren't hard to get out!

So with the fasteners out, I tried to raise the stanchion by prying under the base with a large screwdriver, hoping I could get it high enough to remove the old base and slip the new stainless base on. Nothing doing - not the slightest movement. I then 'tested' the stanchion by wiggling it to and fro to see how loose it was - again, no movement.

OK, maybe I'd just somehow put in new fasteners. I tested the hole with a straightened clothes hanger. It was at least 3" deep, but the rod came up wet and there didn't seem to be anything substantial to take a fastener. I probed another hole as well, to see if there might be some wood or metal I could get hold of with a fastener at a slightly different location. I was unbelieving at what the probe brought up on the third hole. It was a pliable rubber cup that was the home for the machine screw threads! Maybe a previous owner filled the hole with silicone and stuffed the screw in? Then it dawned on me.


This zamak base was solely to keep the rail from coming up. That fastener was doing essentially nil. The stanchion itself was firmly embedded 3" into the foam roof. Even though the foam was wet, it was solid. At this point I decided I might be able to make this base look better, but it really didn't need to be made more secure. Whoever designed this boat was a genius not having anything in the roof to rot.

As long as I was this far into it, I decided to poke one of the holes through the inner liner - into a cabinet above the galley. I used a piece of stainless all thread and a starboard block below to fasten to a Bimini bracket above to prevent the stanchion from moving up.

The allthread runs down into the galley cabinet.


This is the view from inside the cabinet.
 I'll give her a few days to air out, then seal the holes and spaces under the stanchion base. The few drops of water that came out when I punched through the liner into the locker might upset some folks but it doesn't bother me a bit.

Sunday, April 20, 2014

Successful Shakedown on Murray

Our shakedown on Murray this weekend was briefer than expected due to rain and cold, but entirely successful.

The trolling motor on the dink (Rinky) is perfect for getting Merlin ashore. 
The blue and white cooler holds a lawn mower battery. It will be converted to a convenient seat before the next outing.

Mer was a little hesitant to get in the dink the first morning but once he did get aboard Rinky we motored uneventfully the beach. We beached and he jumped out. He went potty and fetched a stick ashore for abut 15 minutes, all the while keeping an eye on me so I didn’t leave without him. When I was ready to go back to the boat, I called him and he jumped right into the dink. We returned to Big Duck and Merlin hustled up the steps when encouraged. Much to the amazement of Suzy, he was completely dry when he boarded Big Duck!


The second morning went a little different. Merlin was quick to get into the dink and quick to get out once we were about 30 feet from shore. He pranced joyfully ashore in tummy deep water. He quickly went potty and we played fetch, then explored the island for about 30 minutes, about which time he decided to go for a swim. He obediently boarded Rinky when I summoned him; he rode up on the bow on the return in anticipation of re-boarding Big Duck. He was patient as I positioned Rinky for him to  disembark.

Eventually, Merlin will have to learn to go potty on deck, but for now, once a day in the morning suits him just fine.

Rinky is a plastic dinghy which was designed for rowing. I had to make an easily removed motor mount for her which turned out to be an ideal setup for securing the oars while using the motor (see pic above). Being small, Rinky can easily be hoisted to the roof of Big Duck for road travel without affecting the 12' air draft. She would fit flat on the roof, but by leaning her against the rail, there's easy access around her to the flybridge. This is nice for the times we opt to leave Rinky on the roof in waters where we know we can beach Big Duck.

I pull Rinky up the starboard side and tilt her over the rail to get her aboard

On a different front...The oil drain plug gasket I replaced didn't stop the oil leak, but I did find I could snug the oily fuel pump bolts over 1/2 a turn, so I think the oil leak has been taken care of.

The new EST distributor performed well with quick reliable starts, although we never took The Duck above 8 mph.

With the plentiful and persistent rain, we discovered that quite a bit of the water that would occasionally drip on the sleeping Merlin was due to condensation collecting on the aluminum window frames. We will address that before the next outing, perhaps by using foam over the cold aluminum.

All Big Duck's system performed above expectation -- the freezer on the aft deck with the brine brick continues to delight me. It keeps my beer at 28° at the bottom of the freezer, but it works as a refrigerator in the baskets on top...for a week without power.

It sure was nice for Suzy's brother Doug and his wife Elaine to come down from Chicago with their 2120 Parker to join us on Murray. It was great seeing them again, not to mention the ease of aided launching/retrieving, and for sure Doug's gourmet cooking. 

Our next adventure is planned for the Chain of Lakes in FL, splashing on/around May 15. Doug and Elaine plan to join us. We'd be happy to have anyone else along as well.

Thursday, April 10, 2014

Dinette Seat Locker Hinge


In order to get a clear view into the dinette seat lockers I need to remove the seat back cushion, then the seat cushion.


Then I can remove the wooden locker cover.


Sometimes however, I'd rather just reach under the seat and force the wooden cover up into the seat cushion - then wrestle into the locker to get what I want. The trouble with the latter method is that the wooden cover is a tight flange fit into the opening. It's next to impossible to get the cover centered properly over the opening because pulling it up disorients it's position.


So I decided that even though it was trouble and expense, I'd put hinges on the covers so I didn't have to center them when putting them back down. Of course one doesn't want bulgy hinges under the cushion so off I went to the hardware store to see what my options were. The visit to the store was not conclusive. I'd have to go back to the boat and re-evaluate the options.

To get a better feel for the geometry of the hinge action I used a couple pieces of duct tape where I was planning to mount the hinges. Those didn't stick well enough to get a feeling for how the hinge would act, so I ran a long strip of duct tape along the side, 1/2 on the wooden top and 1/2 on the hatch opening.

This 'temporary' hinge has been in place for 3 years.


And I'm not the least bit inspired to replace the duct tape with anything more permanent.