Thursday, August 27, 2015

Solderless Terminal Hole

I've got the assortment...
But it seems that regularly I've got a post that's too big for the hole in the solder-less terminal.

Hey, no problem - just run a bigger drill bit through tat smaller hole.
It happens every time - time and again. But no more with this setup.

A Step Drill and a light touch on the drill press.


If you keep a sharp eye out you can pick up a set of step drills from Harbor Freight (Home of the Single Use Tool) for about half of the regular price. 
These are great for holes in thin metal and I suppose other stuff as well?

Monday, August 24, 2015

Bennett Installation


First thing is to get the stern up as high as possible by lowering the jack all the way down so you don't have to stand on your head.


I've got flotation blocks in the lower outside corners of my transom, then smaller blocks the rest of the way up. MJ Thomas at Bennett helped me with measurements that indicated the top of the 'small' actuators included in the M-80 kit would have been inside these flotation blocks, prohibiting me from using the clean, thru transom hydraulics.

This is how I measured.


But the longer actuators would clear the lower block so the thru hole for the hydraulic line can be easily accessible from the inside of the boat.


Bennett shipped the longer actuators to me even before I received my tab kit.


The tab/hinge assemblyy is pretty straightforward -- tape the plates in position, mark the holes and drill. The instructions say to use a 9/64" bit, and to go to 5/32 if necessary. I'm guessing this is because a thin fiberglass transom with wood would benefit from a better grip in the wood with a smaller pilot. The glass in my transom needed the bigger hole. But being perpendicularly challenged, I needed help in making sure I didn't skew the holes as I drilled them. So as usual for me, I used the drill press to make a hole in a square helper, then adjusted the drill bit in the chuck to give me the required depth.

This pilot hole is a perpendicular guide for transom drilling.
With this setup the hole in my transom would be just the right length for the screw.
The helper is shown here used for the upper actuator holes.
I actually used this setup for the hinge/tab first to get a perpendicular hole that is just the right depth.
With the tab/hinge in place, I used a straight edge held against the bottom of the boat with a bottle jack and 5/8 spacer to hold the tab up while I positioned the actuator, then taped the template in proper position for the upper holes. I didn't get a pic during the process, so I re-rigged it after the installation to show how I did it. You may notice in some places the pictures seem to get ahead of themselves - because I wasn't real good at taking them in real sequence.

This picture was taken after I had fastened the top of the actuator but shows how I measured.
After drilling the 3/8" pilots for the the mounting fasteners, I put in the 3/4" hole for the thru transom hydraulic line, hoping I'd measured/calculated correctly.

And "Phew", I had!
You can see the hydraulic line coming thru the transom. If the hole was a little more outward I'd have been into the flotation; and with the 2" shorter 'small' actuator I would have been into the flotation block below.
I like to chamfer the pilot holes and fill them with sealant before installation. A chamfer will keep the gelcoat from cracking when the fastener is run in.
Using a horse needle on the syringe I can fill the hole from the inside out.
More on the syringe technique here.


I also like to swab the thru hull with sealant to protect the wood, and being anxious to finish the job before the sealer set up, used a 'sleeve' to feed the hose thru to keep it from getting all gooped up.


I used the same syringe without the needle for applying sealant to the actuator.


Oh, and Bennett even had the forethought to tape the end of the line running thru the transom to keep junk out of the line during installation.


They might have thought to do the same thing to the actuators while measuring and drilling; it's not a bad idea to do it yourself.


I'm always hesitant to put holes in my boat, but Bennett has made it fun!
It's been a very satisfying morning.


Now all I have to do is notch and refit the swim platform, re-attach the anchor holder and get the inside stuff done.

BTW - if you plan to purchase the indicator for tab position, you'll want to do it right away as it would otherwise require you to remove the actuators to fit the new sender portion (and another hole in the transom). After I had my new tabs fully installed I learned of a free indicator offer - which I took advantage of and had to remove/modify/replace the actuators - in addition to the new hole for the sender wire.

Thursday, July 23, 2015

Houseboat Requirements


With the comment re: "It would make a nice project" I got to thinking about what folks have looked for in a houseboat - whether it was a project or turnkey. Each of us seems to have different views on what we expect to start with. It would be fun to compare the requirements of those of us who have purchased boats and even those who are looking…


Bill has given us a start with a post here
*  A real hull so I could do some coastal cruising and not worry (as much) about a summer thunderstorm on some lake.
*  Twin engines for maneuverability and redundancy.
*  Minimal wood used in construction.  I had read too many stories on this site about rotten frames
*  Equipped with a flybridge for better visibility and more fun on the water
When I started looking around, my search narrowed down to the LandNSea and I have not been disappointed.
Hopefully Bill will have more to add…


Here are some of the things I considered when looking for my current (house)boat.


It had to be trailerable. The expensive trawler I owned had all the comforts of home but it was a lot of responsibility/worry and provided almost zero adventure after the first few months - except in getting it tied up to the dock single handed. This was despite the fact that it was a moneymaker by being in charter service.
Sunshine - 35' Senator trawler
My houseboat to be would have to have accommodations that would make my life as easy as possible in dealing with my wife's lack of mobility. Easy on/off, nice head and shower and easy sleeping arrangements with at least one bunk always available that didn't need to be 'made'. I'm a microwave guy so a full galley wasn't important but I'm glad Big Duck has one; the oven even gets used regularly.
 
It would have to have air conditioning and a generator – this setup had to be workable both on the water and on the road. My houseboat came with a rooftop RV a/c and we were quick to put a Honda 3000i on the roof right in front of it.
Generator can be remote started from below and runs covered as shown.
We didn't consider additional sleeping arrangements for the houseboat even though we'd come from a 2-person cuddy. However, we are soooo delighted that the LNS has room for our two grandkids, their parents and the two dogs.

We absolutely had to have a flybridge. But you know what? I've been up there less than an hour in 4 years of boating. Being able to open the front door while motoring is all I need. Today, the flybridge with it’s wires and mechanics is more of a complication than asset.
Piloting from the flybridge
 I didn't want to have to do any major interior work. I didn’t want to have to touch bulkheads, cabinets, shelves etc. The LNS turned out to be great for this because all of its amenities are built-in fiberglass. I can easily live with obvious repairs from the removal of old equipment, fiberglass discoloring and a few non-critical cracks, as long as I’m not expected to replace rotted bulkheads, walls, cabinets, counters and ceilings.

I wanted an outboard. All the outboard mechanicals are in one easily replaceable unit. There’s no winterization and with a 2 stroke – no oil changes or valve adjustments. The outboard motor is accessible on all sides and some outboards tilt completely out of the water. I loved my Etec. The fallback here was to convert an I/O to an outboard if everything else fell into place with a potential houseboat. This was the absolute priority too, when my purchased houseboat’s outdrive turned out to be an unsupported 40 year old Volvo Penta with 95% of the parts unavailable from dealers, not to mention that it’s nearly impossible to find a mechanic to work on something that old. I was so worried. I looked into converting her to a modern Mercruiser I/O if it would be cheaper than the outboard conversion. Then I bought a complete running VP outdrive for $80 on eBay, but later learned it was for a 4 cylinder, not the 8 cylinder motor I had. So only 2/3 of this replacement drive would be useful. I needed to get the lower third for an 8 cylinder drive to have all the pieces for back-up unit. I then found a complete running 8 cylinder outdrive for $100 and it was 3 generations newer. I now have several hundred hours on the motor with no inspiration to do anything but to keep running the ancient but reliable 40-year-old drive – even though it has no power trim!
Unneeded spare oputdrives

Guess what else? The motor turns out to be a small block Chevy. What could simpler than that? So my outboard requirement was a non-issue.

How about twin engines? Not for me. We’d never be boating where redundancy would be a safety advantage so engine problems would likely just be an adventure. As for the additional control offered by twins – my boat isn’t so pretty that I’m afraid to bump the dock or slide along a piling to tie up, besides, I have only a given number of hours for maintenance. If I have twins, they’re each only going to get half of that time and I’m thinking I’ll be ahead if I spend all that time on my single.

As mentioned, it had to be trailerable…and I do a lot of trailering, so this was a very important consideration. I’m mechanically inclined, but I had to have a trailer under the boat that was sound. I could do tires, bearings, brakes, lights etc, but the frame and axles had to be in excellent condition. My preference is for a factory trailer built for the specific model boat so the boat fits the trailer and the trailer fits the boat. The ad for my boat said that it’s original trailer had been certified road ready which was a big plus.

I didn’t want to have to tow a big honkus, heavy giant boat. We’d been cross-country regularly with other boats and trailers, even to Alaska a couple times. I didn’t want to get into something that would limit my ability to get out and go. Well, this too was an eye opener. The boat turned out to be 28’ long, 12’ high and 8’ wide on the trailer and I’d be towing about 12,000 lbs. Somehow I’d manage?

My winning bid on eBay on a boat I’d never seen meant I’d need to bring her home to SC from Lake Mead, some 2,000 miles. This would be interesting with my aging high mileage van that delivers a conservative 300 horses. I hadn’t done my homework on the weight of the boat/trailer prior to winning her; I just knew I’d need to find a way to get her home.

I loaded some basic tools and a weight-equalizing hitch into the van and with a buddy headed to Lake Mead to see about getting Big Duck 2,000 miles home to SC. There was no drama (after pumping up the trailer tires) for the entire trip home by just dropping the trailer coupler on the 2 5/8 ball on the back of the van – we didn’t even use the equalizing hitch. We have since been back to Powell twice as well as too many trips to count between SC, GA, NC, TN and FL; so much for the worries about towing a big boat. 

My previous powerboats had all been walkarounds. I could go down either side of the boat to get from the bow to stern while docking or anchoring. I was worried that the houseboat didn’t have this convenience. But it became apparent the first time to the dock that it was much quicker getting to the stern via the cabin than tiptoeing down the narrow walkways outside the boat. An even bigger advantage is the extra room inside the boat now that the cabin has full beam.
Walkaround with narrow cabin
 Hull shape/form, deadrise, cruising speed and stability were non-issues for us. We’d just get out on the water, stay safe and we’d take what she offered. And we were unbelievably surprised to find that the LNS is an extremely comfortable boat. In all our other boats we’d need to yell every time we approached a wake to make sure no unsuspecting crewmember would get upended and folks below would be able to prevent fixens from getting thrown off the table or stove. Then we’d throttle back to about idle and change course to hit the wake at about 45°. We quickly found that Big Duck’s hull is such that we can totally ignore even the largest wake – all we experience is a gentle up and down no matter how we cross it.

ECONOMY! What about economy? This is a big thing with boaters, even those with $300,000 trawlers get serious about economy. Wasn’t I concerned about an economical hull form and economical propulsion? Nope! Not in the slightest. And I can honestly admit that I’ve never heard a houseboater say, “I’d go out more often if my boat got better mileage”. You go or you don’t – period.

I guess the last thing is price? What is your budget? I knew I had to get into a houseboat to continue boating so my budget was likely a bit higher than yours. I’m also retired, kind of handy and have a decent set of tools so I didn’t mind if I’d need to spend time getting things safe, reliable and comfortable. I thought I might go $10k for the right boat and maybe even for the wrong boat if I couldn’t find one soon enough. You’ll likely spend extra if she has a deadline for getting used.  I guess it all depends on what you’re comfortable doing yourself.

Big Duck showed my requirement for a decent original interior. Nice original head, shower & galley. Flybridge. Updated motor w/ 10 hours. Certified road ready trailer. Currently in the water. OK, 15k max knowing she’d need work but it was stuff I could and wanted to do myself. I got anxious, then placed my maximum bid @ a foolish 16k.

She came to me at $11,000 – I’m guessing I’ve put half that much into her and have been happy as a clam ever since. 

More here about getting her ready for her Powell.


Monday, July 6, 2015

Good Decision on Boat Rooftop Air Conditioner/Generator Install

I've got a 40 year old 28' houseboat that requires air conditioning both on the water and on the road. It came with rooftop air but no generator. I talked about putting a Honda 3000i generator on the roof of the boat to power the air conditioner and other conveniences.

I got a lot of flack about putting so much generator weight on the roof of the houseboat. That's a couple hundred pounds about 8 feet above the waterline (and ~10 feet high on the trailer). Those folks were worried about geometry and stability underway while I was only worried about comfort on the water. The generator was going on the roof.

I've had boats for over 40 years and I'm no dummy so I knew there would be consequences of putting weight that far above the waterline. When we were living on the sailboat (for 3 years) we understood that for every ounce aloft, one needed a pound of ballast. The brochures for our old houseboat even warned about too many of the crew on the roof at one time. But like I said, "The generator was going on the roof!" And it did.

The generator is just in front of the air conditioner

But the way the generator was installed turned out to have an unexpected benefit. The base that the generator sits on is firmly attached to the roof of the boat. Here you can see the base and the cover.
The base is upside down in the pic. The holes in the base are for wire feeds.  


I put doorstops between the base and the boat's roof.

The base is bolted to the roof of the boat. More on that here:
http://72land-n-sea.blogspot.com/2011/07/monumental-achievemant.html

The generator just sits on the base. The cover slides over the generator and down over the base. This way the cover and generator have no attachment to the roof. The tight fit of the cover over the generator and a similar tight fit of the cover over the base allows gravity to keep everything in place. The thought here was that if the boat did become unstable to the point of almost rolling, the generator would be sacrificed overboard to help with the righting moment.

Well, we've never tested the sacrificing principal but when exiting a gas station at Tickaboo I was careful to clear the overhanging branches with the van, but the boat cut the corner significantly closer and a stout limb caught the generator cover. The cover was knocked back about 45° while pushing the generator off the base by several inches. If either of these two units had been fixed to the roof there would have been major damage to the boat, but because of the way it was mounted all that was needed was to relocate the generator on the base and reposition the cover.

Sometimes you get lucky.


Thursday, July 2, 2015

Hot Hubs & Trailer Bearing Grease

When you check the temperature of your trailer hubs, how hot is too hot?

In the past I'd touch a lug nut. If I could hold my finger on it I was happy. Then I started using a non-contact thermometer and could get an instant digital reading. I always stop about 50 miles into a trip for the first bearing/tire check. And I stop about 50 miles later for another check. If both times the readings are under 100° I don't plan any more regular stops, but do check them at any rest area or gas stop.

If the readings are between 100 and 200°F I'll check every hundred miles or so. Temps can easily get this high during hot summer months in traffic with a lot of braking or during downhill compression braking with surge brakes. If your hubs don't ever get hot, your brakes aren't working. I've seen 300° on a drum brake that ran thousands of miles without attention after it was 'unadjusted'.

When any check shows a hub temp over 250F it's time to be concerned (like in the dragging 300° brake above) but if you've done a yearly bearing re-pack, it's usually a dragging brake. Surge discs were a nightmare for me. They were constantly overheating due to brake drag from sticky calipers that aggravated a "tight" spindle nut.  We see smoke in the rear view mirror, or worse yet experience the wheel coming off the trailer. We quickly pull over to the side of the road. No wonder I've got a problem...all the grease ran out -- there's grease all over the place.

In my experience that's the thinking that allows this to happen again and again. More grease. More grease. Pump grease in before, during and after every outing to fix the problem. I've got news, the grease doesn't just decide to leave the hub on it's own. It's heat that that makes it fluid enough to escape.

Sure, the heat can come from a bearing that rusted from being waterlogged, but you'd catch that on your annual repack, likely before it became a real problem - unless of course you give your Bearing Buddies a few pumps and drag the boat off the lot after it's been sitting for a couple years.

Today there's even a better method to keep tabs on your trailer tires/hubs. It's a TPMS which allows you to see the tire pressure in your trailer tires and the temperature at the valve stem while you drive. It alarms if the pressure drops more than a few pounds in a few minute or immediately if there's a blowout.
Click here for TPMS info.

Then I discovered the Posi-Lube / EZ-Lube systems I thought they were the perfect companion to my TPMS.
Posi-Lube
EZ-Lube

Now I could repack my bearings without any dis-assembly. I could tell if the grease coming out was contaminated, and only if it was would I need to dis-assemble the hub. What a blessing!

Turned out that I bought a boat/trailer that didn't have the Posi or EZ Lube convenience. My first thought was, "I'm getting new modern axles - I'm not going to dis-assemble four hubs every year."

I towed many thousand miles during which I upgraded the springs and tires on the trailer but there was never a good time to replace the axles. In preparation for our second trip of 2,000 miles towing to Lake Powell from SC I pulled the dust caps to see if there was any water getting into the bearings that I had replaced only a few hundred miles ago. One of the dust caps had a ruptured rubber plug and the grease in that hub was a slightly lighter color.

I'd seen this before and it never amounted to more that a little water getting to some grease  in the outer part of the hub. And if I'd had an EZ-Lube hub I would have just 'repacked' the bearing. But because I was planning a 2,000 mile road trip I decided to pull things apart and make sure everything was all right.

This is what I found:
If I'd had EZ-Lube axles and conveniently repacked this bearing, I never would have found this problem but who knows, maybe it could have endured until I inspected things a year later?

This find bothered me, so I decided to visually inspect the components of the other three hubs...and lo and behold I was glad I did.
There was galling on another bearing. I replaced the Chinese bearings in all 4 hubs with American made Timkins. The 4,000 miles out and back to Lake Powell was uneventful.

The moral of the story is, that even if you have the most sophisticated hubs, there's no substitute for visual inspection.


Tuesday, June 30, 2015

Remote Bulb Digital Temperature Controller


I love these things.
They're less than $20 from eBay or Amazon and can be used for many things. They turn on/off power depending on the temperature at the remote probe. The original units were Centigrade only but now they can be found in Fahrenheit or selectable. Most have a 10 amp switching rating but if that's not enough a relay can be used. There are models that operate on 12, 24, 120, 220 volts and the switched leads can be independent of the power supply. You could use 120VAC for power to switch a 12VDC circuit or vice versa. Most are selectable for cooling or heat and some can do both.

My first project was a DIY fish tank heater that I wanted to run on 12vdc. I didn't mount any of the components, just had wires going everywhere.

The second project was converting a chest freezer into a refrigerator. Off the shelf the freezer could only be set between -4° and zero F. I wanted to put my beer in the freezer and keep it at 28°. This time I built a tidy little stand alone box with a plug for 120 power and a receptacle for the freezer plug.


Big toggle allowed switching off the controller so the freezer could be uses as a freezer.

My next project was for a fellow who wanted to maintain a stable temperature in a room in his barn for eggs. Sometimes the eggs would need to be heated, sometimes they'd need to be cooled. He didn't want to have to monitor them constantly and I knew one of these gizmos would do the trick. I simplified the construction by just mounting the components on a board. The pic was before I wired the additional recepticle for the heating circuit.

The white connector block is available at most hardware stores and online. Look for: 

My current project is my boat's refrigerator. When the 40 year old factory 12/120 volt unit gave out I decided to replace it with a considerably cheaper 120 VAC only unit. I figured to power the new unit via my boat's house battery through an inverter. I bought a dorm fridge that didn't include the tiny ice maker - the half dozen ice cubes it might provide take up too much room inside inside the fridge. This system worked great except the fridge would occasionally solidity/freeze my wife's lettuce.

I still don't know why I couldn't find the correct thermostat setting. Maybe it's because the unit is used on the road and on the water. Maybe it's because the unit isn't on a permanent leveled surface. Maybe it's because the inverter messes with the internal refrigerator components. Rather than research all the possible causes I took the easy way out and installed a controller.

Wire up the controller:

I cut a cheap extension cord in half for the plug and receptacle wires.
 Set the controller cooling temp for 35°...that's when the controller will switch off the current to the fridge. Set the controller 'slew' to 5°...any time the probe sees a temperature 5° above the cooling temp the controller will begin feeding power to the fridge.

Plug the controller into the power source. Set the refrigerator to maximum cooling. Insert the remote bulb into the refrigerator. Plug the refrigerator into the controller. Now the guesswork is over. The power comes on at 40° and goes off at 35° and I can see the inside fridge temp on the controller.

What a comfort to know the temp inside the fridge!
The original fridge was larger than this dorm unit. The grates above and to the right are fillers to the original opening. I left those areas open for ventilation.

I didn't want to put any holes in the dorm fridge when I installed it. I secured the new unit in the old space with a reverse clamp setup.

I soldered some long nuts to a piece of brass angle. Then using bolts of the appropriate length, I ran them up out of the long nuts until the fridge was wedged in place. The wing-nuts keep the bolts from working back down. The brass angle was a handy place to mount the controller. This setup has been bulletproof.

And if you're curious, here's an early heating unit with a 30 amp power relay.
This was before I discovered the convenience of the Terminal Strip
What's the square red button for?

This rig was used to cut the power to a hotplate when a given temperature was reached. The controller will cycle on and off depending on the temperature at the probe, but the relay only allows power flow after the button is pushed. So to initiate power to the hotplate, the temperature has to be below the set point AND the momentary red button has to be pushed. When the set point is reached the controller shuts off the power. As things cool the controller will cycle on again but the hot plate cannot get power unless the button is pressed again; the cooking is a one time event. So now, the next time you make caramel and are supposed to turn off the heat when candy thermometer shows 250°F you don't need to be there - this thing will turn it off at the desired temp and it won't go back on.

Sunday, June 21, 2015

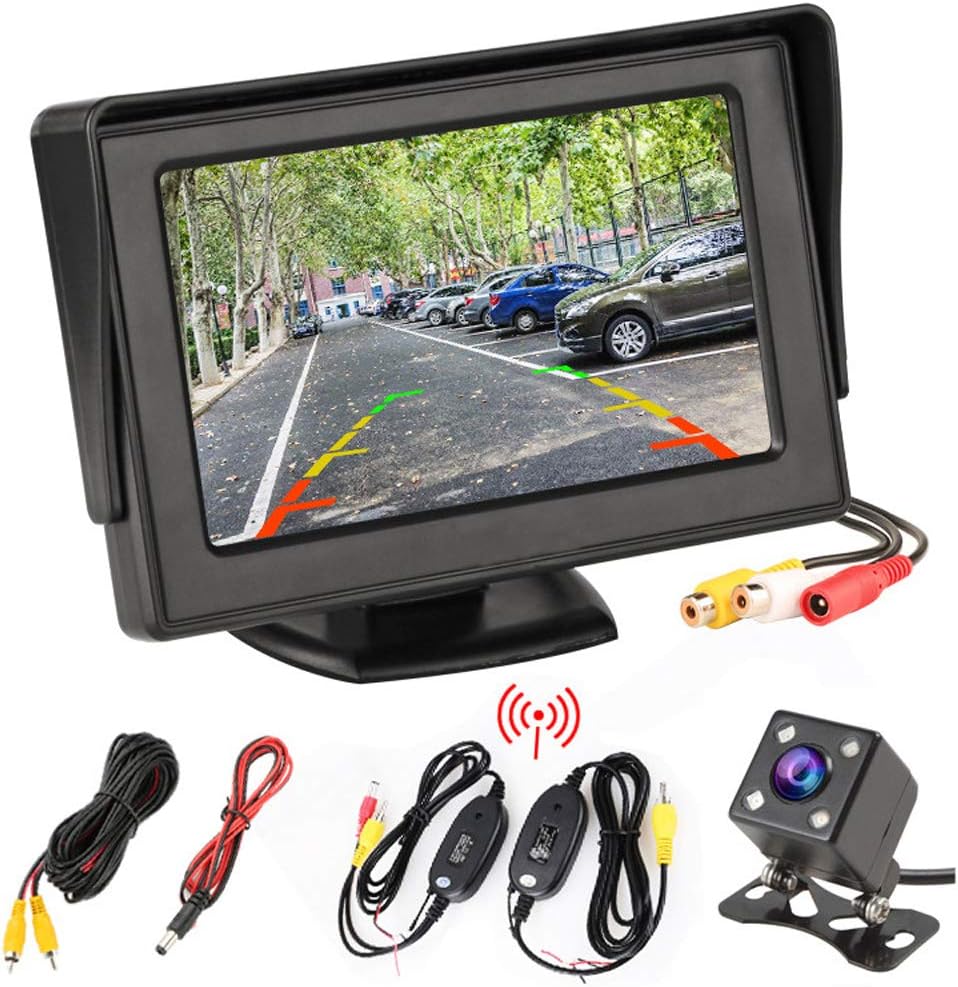
Backup Camera

 Big Duck uses a license plate camera mounted to a metal plate on the stern rail with magnets.

At the helm we have a color display that is really quite clear even at night.

And because the system is wireless I can easily move the monitor to the truck to see what's coming up behind the boat on the road (it clips over the rear view mirror), or I can stick the camera to the back of the van if I'm not pulling a trailer.


The one pictured below is similar - all you need is 12vdc at each end (for the camera and display) - there's no wire needed to connect them.


Amazon wireless backup.